Management 101

In this series, we’ll cover the basics of Management & organizational behaviour using Organizational Behavior 16e by Robbins, Judge, Vohra as base reference

What is an Organization: Organization is a consciously coordinated social unit, composed of two or more people, that function on relatively continuous basis to achieve a common goal or set of goals

Who is a Manager: Manager is an individual who achieves his goals through other people. They make decisions, allocate resources and direct activity of others to attain goals of the organization

Functions of Management

  • Planning: Process that includes defining goals, establishing strategy and developing plans to coordinate activities
  • Organizing: Determining what tasks needs to be done, who is to do them, how the tasks are to be grouped, who reports to whom and where decisions are to be made
  • Leading: Motivating employees, directing others, selecting the most effective communication channels & resolving conflicts
  • Controlling: Monitoring activities to ensure they are being accomplished as planned and correcting any significant deviations

Management Roles: Refer to this excellent article, which refers the ten roles performed by the managers in detail : https://www.mindtools.com/ajfb1ev/mintzbergs-management-roles

Management Skills

  • Technical Skills: The ability to apply specialised knowledge or expertise
  • Human Skills: The ability to work with understand and motivate other people both individually and in groups
  • Conceptual Skills: The mental ability to analyse and diagnose complex situations

Effective versus Successful managers

The following article explains effective vs successful managers factors in detail http://technologyof2017.blogspot.com/2016/11/effective-versus-successful-managerial.html

How to use GitHub from your Virtualbox VM on MacOS

In this article, we’ll understand how we can connect to your GitHub account from Virtualbox VM hosted on MacOS. The steps are as follows:

  1. I created a fedora 21 VM. Once you create your VM in the virtual box, stop the instance & go to settings

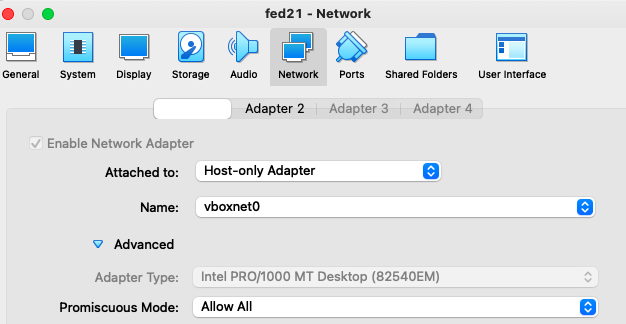
2. In the settings, go to networks and reconfigure Adapter 1 as Host-Only adapter, in advanced setting, choose default adapter type, promiscuous: Allow All, Cable connected

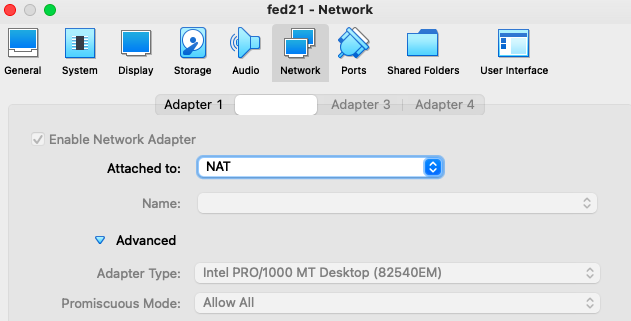
3. Click on the Adapter 2, choose NAT and let advanced setting be default. This is required for internet connectivity for the VM

4. Restart the VM, and run “ifconfig -a”, it’ll show you address starting with 192.168.XXX.XXX

5. sudo & Install openserver-ssh on your vm and start the ssh service and check if ssh service is running

6. Now open terminal on your Mac & ssh to the your VM –> ssh -p 22 user@192.168.XXX.XXX, it should allow you to log access the VM

7. Log on to your GitHub account and create the repository or if you’re planning to use existing repo, follow the steps from GitHub: https://docs.github.com/en/github/getting-started-with-github/using-git/pushing-commits-to-a-remote-repository

8. When you push/merge the code, it’ll ask for your GitHub user/password, post which you’ll be able to see your code pushed to Github repo

Newton’s laws for Life

Last week I read a blog on Newton’s laws of motion, after pondering over the laws and Newton, I realised Newton’s laws are not only integral part of Physics but they very well adapt to professional lives as well

First Law of Motion states that, “if a body is at rest or moving at a constant speed in a straight line, it will remain at rest or keep moving in a straight line at constant speed unless it is acted upon by an external force” —- When we’re in our comfort zone and a change happens, we procrastinate over it, deny it but deep down we know the external force (Change) has set things in motion and we need to get out of our comfort zone and start to up-skill ourselves to address that change. Subconsciously we may not realise but once we’re out of our comfort zone, we start to progress and when you look back in time and try connecting those dots, you would realise those changes made you better 

Second Law of Motion states “that the time rate of change of the momentum of a body is equal in both magnitude and direction to the force imposed on it” —- You might have read, heard or watched Stalwarts in your industry and common string that you would have observed in all of them is how passionate they are about their work and organisation. Passion and drive are the two key elements in professional career & its important to realise these two key elements are not mutually exclusive and when coupled with the right direction, it’ll surely lead you to your desired path

Third Law of Motion states ” that when two bodies interact, they apply forces to one another that are equal in magnitude and opposite in direction or to every action there is equal and opposite reaction” —- In our everyday lives, we come across many situations and their outcomes depend on the way we react to those situations, we may choose to leave things as is or we may choose to fight it. Both options are equally good but take a pause and make a conscious choice, if it’s worth it? Use it for your betterment, choose to fight with the habits thats stopping you to improve yourself and you may choose to leave certain issues as is for your mental peace. Not every battle is worth the fight

Things to do before and after signing up for Azure Free Account

Before signing up for Azure Account

  • You’ll need to create a Microsoft account. You can sign up here
  • Ensure you enable Multifactor Authentication for better security

To create a free Azure Account refer steps mentioned here

After signing up for Azure Account

  • Click on the Cog/Gear symbol to view & change the Portal settings as per your preference
  • Navigate to Resource group or type “Resource group” in the search bar in the Azure Portal
  • Create a Resource Group, it will help organize all the resources that you’ll create in it. Also tag it for better organization & billing visibility
  • Navigate to Storage account or type “Storage account” in the search bar in the Azure Portal
  • Create a Storage account in the resource group that you created, chose region closest to you or the default location. Also tag it for better organization & billing visibility. This Storage account creation may take a while
  • On successful completion or failure, you should be able to see the details in activity log or bell icon
  • Enable the cloud shell & use the storage account that you created. This will allow you to run interact with Azure Portal using PowerShell/Bash

How to use your existing VirtualBox instance with Vagrant

In my earlier post, we saw how to use vagrant to spin up virtual development environment using VirtualBox. In this post, we’ll learn how to create base box from existing VirtualBox Linux instance(CentOS/Fedora) with Vagrant.

Guest Instance Changes

You’ll need to make the following changes to the existing instance from VirtualBox GUI:

  • In VirtualBox GUI, right click on your instance & go to settings –> Network
  • In Adapter1, check enable & choose attached to: NAT
  • click on Advanced, port forwarding –> add & set the following values:
    • Name: ssh
    • Protocol: TCP
    • Host IP: leave it empty
    • Host Port: 2222
    • Guest IP: leave it empty
    • Guest Port: 22
  • Click Ok.

Guest OS Changes

  • Log on to the instance & you’ll need to make following changes in the Guest OS:
    • Add vagrant user; sudo useradd vagrant and set password : vagrant
    • As root user, add vagrant to sudoers list & save it
      • # visudo
        • Defaults:vagrant !requiretty
        • Defaults env_keep = “SSH_AUTH_SOCK”
        • vagrant ALL=NOPASSWD: ALL
    • Update vagrant insecure key: required for login to the box
      • $ su – vagrant
      • $ mkdir -p ~/.ssh
      • $ chmod 0700 ~/.ssh
      • $ wget –no-check-certificate https://raw.github.com/mitchellh/vagrant/master/keys/vagrant.pub  -O ~/.ssh/authorized_keys
      • $ chmod 0600 ~/.ssh/authorized_keys
      • $ chown -R vagrant ~/.ssh
    • Install & Configure OpenSSH Server
      • $ sudo yum install -y openssh-server
      • $ sudo chkconfig sshd on
      • $ sudo vi /etc/ssh/sshd_config & update the following & save the file:
        • Port 22
        • PubKeyAuthentication yes
        • AuthorizedKeysFile %h/.ssh/authorized_keys
        • PermitEmptyPassword no
        • PasswordAuthentication no
    • Restart the ssh-service:  $ service sshd restart
    • Install VirtualBox GuestAdditions
      • $ sudo yum install -y gcc make kernel-devel
      • In the VirtualBox GUI, go to Devices > Install Guest Additions… from the menu bar
      • cd /media/VBOXADDITIONS_XXXXX
      • sudo ./VBoxLinuxAdditions.run
      • sudo umount /media/VBOXADDITIONS_XXXXX
    • Clean up the box to minimise the size & shutdown the guest OS
      • $ sudo yum clean all
      • $ Shutdown -h now

Package Guest Instance

  • On your host instance create a work folder
    • $ mkdir -p ~/workspace/centos64
    • $ cd ~/workspace/centos64
  • vagrant package –base <Guest Instance Name>. On successful completion, it will create a package.box file in the folder

Testing

  • Run the following from the folder, where package.box is stored
    • $ vagrant box add <instance_name> ~/package.box
    • $ vagrant box init : will initialise the box
    • $ vagrant up : will start the instance
  • To login to the Guest from host :
    • $ vagrant ssh